Monday, September 14, 2009

WTH??? - Where The Heck have I been?????

Seriously my dear readers, I can NOT believe it has been this long since I posted!!! - UGH! I miss you and baking for myself so much! I have (thankfully) had TONS of stuff going on in my life (good stuff). I have been baking cakes for others almost every weekend since my last posting AND a few other things. I hope you bear with me for just a little while longer. I have TONS of fabulous, yummy things to share with you for the fall. In the meantime I wanted to share some of what has been going on with me. The most recent cake I made is this baby shower cake. I can't help but be in love with the teddy bear! He was almost too cute to eat! It was a two tiered cake with a 10 inch white cake and strawberry filling on the bottom topped with a 6 inch strawberry cake with butter cream frosting all of which was covered with fondant and of course this adorable little bear!

Blog1

This cutie patootie surfer girl was another weekend’s project for a special 16 year olds birthday. She was made out of all fondant and the cake was a chocolate cake with strawberry filling, butter cream frosting and fondant. How cute is she???

Blog 1 - SG

Up next was Wow Wow Wubbzy for a sweet little one year olds first birthday party. They told me that she thought it looked so much like Wubbzy that she was slightly scared to eat it! It was as single layer chocolate cake frosted with butter cream frosting and covered with fondant.

Blog 1 - WWW

Last but not least, we have the soccer lover’s cake! This was a birthday cake for a birthday celebration shared by two little guys who love soccer. I incorporated two colors of their uniforms and of course personalized the jerseys with their individual numbers. I think they really liked it and hopefully it made a good impression with the soccer moms! It was chocolate cake with butter cream frosting. The ball and jerseys were covered in fondant.

Blog 1

I have a fabulous wedding cake that I will be working on this weekend for a very beautiful bride and I will be sure to post pics as it will be a one of a kind!

Finally, here is something else that has been distracting me from my blog (but what a wonderful & beautiful distraction she is)
Morgan Mobile

This is my 18 year old daughter Morgan. When Will got his promotion to California, Morgan decided to stay in PA to finish out her senior year. Well school is done and summer is winding down so I am proud and excited to say that Morgan is coming here to live with us!!! I have been making plans, shipping arrangements, flight arrangements, plans for going back home etc. (if anyone has any advice on shipping just clothing and shoes freight, I'd be so grateful if you'd share your knowledge and info. Thanks!) I will fly back home for a week the end of September/beginning of October to get Morgan and then after that I am all yours! Back full time and baking more than ever especially during fall which is my favorite time of the year! See you all soon!

Stacy

Monday, August 17, 2009

Chocolate Chip Cookie or Cupcake? HAVE BOTH! Chocolate Chip Cookie Cakes

Blog 1 - CCC

Some things a girl should never tell…her age, her weight and her favorite recipe that has potential to make money for her someday. For that very reason I wanted to make one of my favorite cupcake ideas, but I’m not quite ready to share my secret recipes for my homemade goodies yet. Wipe your tears from your eyes my friends, this one is just as good and I’ll tell you are secret, come a little closer, shhhhhhhhh, it is all made from boxed mixes with the exception of the frosting. Will came in and said “are those homemade?” to which I lovingly answered “Well they were made in our home!” LOL. But ladies and gentlemen that is as close to homemade as these get. When I can’t or don’t want to use “from scratch” recipes, I like to at the very least try to dress up an otherwise lame boxed mix. That is just what these babies are all about! They are the can’t decide between a chewy chocolate chip cookie and a heavenly cupcake? HAVE BOTH cookie cake!

Blog 4 - CCC

Ingredients:

Cupcakes:

1 white or vanilla boxed cake mix of your choice.
Water - according to directions
Oil - according to directions
Eggs - according to directions
1 Cup Mini Chocolate Chips - plus more for garnishment.
1 TBSP of all purpose flour.
Paper cupcake/muffin liners.

Butter Cream frosting:

2 Cups shortening
2 tsp clear vanilla
7 TBSP of water
2 pounds of confectioner's sugar

Cookies:

1 pkg of Betty Crocker Chocolate Chip Cookie Mix
1/2 Cup of Butter - 1 stick
1 Egg
Regular size chocolate chips for garnish

Directions:

Cupcakes:
Mix and prepare according to directions on package. Toss 1 Cup of mini chocolate chips with 1 TBSP of all purpose flour. Fold into prepared batter. Bake according to directions. Allow to cool completely.

Butter Cream Frosting:
Beat all ingredients until icing forms peaks (7-10 minutes at low speed with a heavy-duty mixer, 10-12 minutes at high speed with a hand-held mixer).
NOTE: Keep all utensils completely grease-free for proper icing consistency.
* For stiffer icing, use 1 tablespoon less water.
**When using large countertop mixer or for stiffer icing, use 1 tablespoon less water.

*Instructions can be found on the Wilton website.

Cookies:
Prepare and bake cookies according to directions.

Once cupcakes have fully cooled, I used a long cake decorator’s tip to fill the middle of the cupcake with frosting. Take the longest tip you have (preferably one with a round open end), insert it into the middle of the cupcake and squeeze. Next frost the entire top of the cupcake with butter cream frosting. Style it according to your choice. (I decorated mine using only a pastry bag with a coupler inside.) Make sure you add an extra bit of frosting to the top center of the cupcake. Next you'll want to shake a good amount of the mini chocolate chips onto a plate, roll cupcake in chocolate chips. The way I did this was dip down and lift, turn slightly, dip down and lift until all sides are thoroughly covered. Next place a well shaped chocolate chip cookie on top of the frosted cupcake slightly tilted to the side. Top with a dollop of butter cream. Last but not least, garnish with a larger sexier chocolate chip and there you have it chocolate chip cookie cakes! Enjoy!

Blog 5 - CCC


Tuesday, August 4, 2009

Recycling cake scraps.... Chocolate Covered Strawberry Cake Balls

Blog 3 - CB

I don't know what to call these, I mean they are essentially cake balls BUT for whatever reason that just sounds so gross to me. They need a more chic name like cake truffles or cake bon bons, something. I should hold a contest to name my personally made ones. Too bad I didn't think of this sooner it would have been a perfect give a way! Bakerella does some FABULOUS things with these little delicious delights! You have to see all of the things she comes up with. Plain and simple, she ROCKS! Check her site out for complete directions and so many fabulous ideas! You can visit her by clicking here. I adapted mine slightly using vanilla frosting instead of cream cheese basically because I usually make my own frosting and therefore do not have usually have a can of store frosting around BUT I did have a can of vanilla that I found for a project that never came to be - ummmm, yeah I have way to many "good ideas" to mention that happen like that. The land of forgotten baked goods. You know those ingredients that end up being used for something other than their original intent. Oh well, all’s well that ends well right? I had cake scraps from a birthday cake that I made over the weekend. (The Steelers jersey birthday cake (for Bryan turning 24 - Happy Birthday Bryan!!!) that I mentioned in a previous post.) Blog 2 - SJ

NOTE: For the correct and entire recipe please see Bakerella's blog!!!

I used the cake scraps - or the left over cake from two 13 x 9 strawberry cakes - the crown (or top) which was cut off of both of them and about a quarter of the other 13 x 9 that I used to carve the sleeves. All in all it was probably about half of a whole 13 x 9. Did I lose you yet with all of that?

Blog 4 - CB

I crushed up all of the strawberry cake scraps to get them into crumbs and mixed about half of the can (15.6 oz) of vanilla frosting. Once I made sure it was thoroughly mixed, I used a cookie scoop and made approx 1 inch balls. I placed them on a cookie sheet with wax paper and placed them into the freezer for approx 6 hours until set. Once they were set enough to dip, I melted 1.5 bags of Wilton Candy Melts. (for directions on melting chocolate see my post here) (I have used Almond bark in the past). I used a toothpick inserted in the middle of the cake ball to dip into the chocolate. Once completely covered I placed on a cookie sheet covered with wax paper, drizzled on the opposing chocolate flavor and placed in the refrigerator until it was set. Viola! There you have cake balls (truffles- bon bons- LOL)! Recycling never tasted so good! ENJOY!

Blog 5 - CB

Thursday, July 30, 2009

Making fondant "pregnant" - the latest addition of Stacy bakes...

Blog 1 - PL

WOW, has it really been that long since I posted anything? Time sure does fly! In short, I have been up to my elbows in frosting and cake batter (and loving every minute of it!) I promise to be back in the next day or two with some actual recipes but for now I will entertain (and distract) you with some cakes that will hopefully make you smile! These were for Will's co-worker. She is pregnant with twins!!! How wonderful!!! Today is her last day before maternity leave and they are having a potluck luncheon for her. I was requested to make two round cakes both with butter cream (UGH - I just can't get used to seeing butter cream after working with fondant! I'm totally obsessed with getting it as smooth as possible to try to resemble fondant). They are both 9 inch rounds - one is white cake the other is strawberry. The figures on top are made totally of fondant. This was the first time I actually tried my hand at making figures. How'd I do?

Here she is from the side -
Blog 3 - PL

The colors were lavender and mint green to match the nursery colors.
Blog 2 - PL

Next we have the two peas in a pod, pea pod cake. I got my inspiration from this site. I think these are Will's favorites!
Blog 4 - PP

Here they are again looking down from the top. I also tried to incorporate the nursery colors in this one by including the little lavender flowers.
Blog 5- PP

If you love that, wait until you see the back! Here it is - a huge pea pod!!! I needed support for the little guys as I knew Will would be driving on the freeway, alone, in a manual transmission car, so I knew it needed TONS of support - hence the giant pea pod.
Blog 6 -

In addition to these I had an order for a dozen blueberry muffins that I fresh baked at 1 am! Today is my "day off" and boy do I need it!!! I have another cake that is due on Saturday - a Steelers cake - imagine the irony of it all - a Pennsylvania girl living in California making a Steelers cake for a California man! Too funny! Poor Will, tomorrow is our 5th year anniversary and he'll be lucky to get cake scraps for our anniversary dessert. Oh the life of a baker!!! Hope you enjoyed them! Thanks for looking!
Blog 7 - both cakes

Wednesday, July 22, 2009

Chocolate Chip Cookie Cups - my latest cookie creation!

Blog 2 - CC

Some things just go to be together: Peanut butter and Jelly, Bread and Butter, Batman and Robin, Movies and Popcorn, Smoke and Fire, Shoes and Socks the list could go on and on, AND now Cookies and Butter Cream Icing! These are two of my favorite things, and what do you do with two of your favorite things? Find a way to put them together to live in perfect harmony, which is just what these little bits of deliciousness are all about. You see one day I had left over cookie dough AND left over butter cream icing. Come on admit it, we've all had the lazy days where we think “you know what I could do with that frosting? No wait that would mean I have to make cupcakes. Or look at that left over cookie dough, but wait we just had chocolate chip cookies.” Out of this dilemma was born the cookie cup! When left in an office without a definition attached to them they have been known to be called “cookie muffins, chocolate chip cupcakes, “Mookies” or Cuffins.”
Will originally thought it would be too sweet but quickly realized the love affair between the two could not be denied. He now loves them as much as I do, as do his co-workers, friends and family.
Blog 4 - CC
As for the recipe you can use your own favorite top secret cookie dough, the one found here, or on occasion I have even (gasp) used the Betty Crocker chocolate chip cookie mix. Either way as long as they are a chewier type cookie it will work like a charm. I used the same process that I did with the Cookie Bites with the addition of making an indentation in the middle of the cookie after they are removed from the oven but prior to them cooling (if you wait too long after they begin to cool, they will crack). After they cool completely go back and pipe in butter cream icing into the center cavity. The recipe for butter cream icing can be found here or again you could use your own super secret formula. Auden said they are two thumbs up and she would "give them more thumbs up but I don't have any more thumbs”. :) Hope you enjoy them as much as we do!

Blog 1 - CC


Tuesday, July 21, 2009

It might be warm out side but it's "Chili" here! - Vegetarian (and meat lovers) Sweet Chili

Blog 1

Okay readers; please don't hate me for this recipe. I will warn you in advance that this is a "William Original" which means no measuring on the spices. So, it's "to taste" when you get to the spices part of it. Trust me, I know, try living with him. :) On a positive note this chili won second place in a chili cook off several years ago at Will's work. Still to this day he is so proud of his second place finish and dollar store ribbon which he received as his prize. It's the little things in life people...

What makes this chili different is in the fact that is it sweet - but after visiting this blog, would you expect it to be anything less than that? I will type it out both ways for either our vegetarian counter parts or our meat loving friends as well. Either way you go, you won't go wrong with it! But on a side note, I will say that Will's second place award winning chili was made with the Morningstar Farm Crumbles and only AFTER they ate it and voted did they find out who made the chili (as the crock pots weren't marked) did they realize that they weren't really eating meat. The other nice thing about using the crumbles is that it makes it lower in fat, BUT like I said either way - vegetarians or omnivore, I will love you all the same either way you try it, it's not trying it at all that will make me give you the evil eye. :) Okay enough of the mindless chatter and poor attempts at humor, on to the recipe!

Blog 3

Ingredients:

1 pkg of Morningstar Farms Crumbles (ground beef substitue) or approx 1 pound of groud beef *NOTE* I say approx. because I have obviously never cooked with it but on our vegetarian substitute it states that one bag of meatless crumbles is the equivelent of 1 pound of ground beef.

1/2 jar of chili sauce (12 oz jar)- approx 3/4 of a cup

2 TBSP of Extra Virgin Olive Oil

2 or 3 strips of sweet roasted red pepper strips (approx 1/4 cup finely chopped)

2 TBSP of ketchup

1 Can (15 oz) of red kidney beans - drained

1 Can (15 oz) of black beans - drained and rinsed

1 3/4 Cup of crushed tomatoes

1 can (4 oz) of diced green chilies - drained

1 1/2 TBSP of minced garlic

1/4 cup of finely chopped green bell pepper

1 can (15.25 oz) of Whole Kernel Sweet Golden Corn - drained

5 tsp sugar

Cumin and cilantro to taste - (I warned you!)

Mexican Style Shredded Cheese blend - Optional

Directions:

*In a medium sauce pan brown meatless crumbles or ground beef in 2 TBSP of olive oil

* Finely chop sweet roasted red peppers and green bell pepper. Add to ground beef mixture

* Add chili sauce, ketchup, kidney beans, crushed tomato, green chilis, minced garlic, black beans, corn and sugar.

* Cook on medium to low heat for 30-40 minutes.

* Sprinkle top with Mexican Style Shredded Cheese Blend - optional

ENJOY!


Monday, July 20, 2009

The Power of Fondant - Fondant Attempt - Take 2

Photobucket

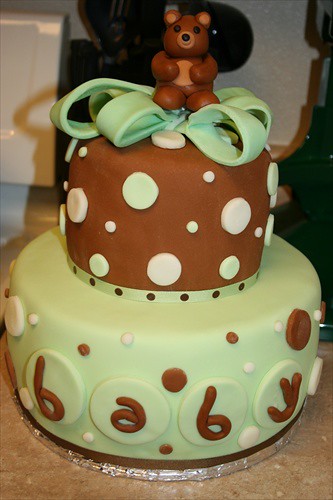
(Cue the dramatics) - I'll just say it, I have issues people! LOL. What is it about fondant that can bring a grown woman to tears? I mean come on, in the end it's just cake people! But yep that was me over the weekend. After my 
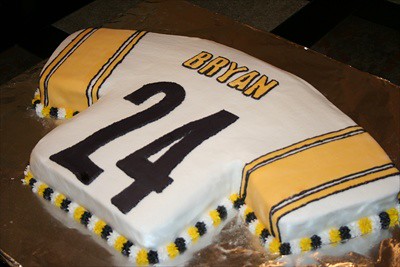
first fondant attempt last weekend, Will showed the cake to one of his co-workers (which is one of the sweetest people you will ever want to meet), and she ask if I could make a cake for her sisters birthday. The butter cream part of me screamed - "Sure no problem" and then I learned she wanted a two tiered fondant covered cake - UGH- the sick in the pit of your stomach feeling took over. The confidence turned from "Sure, no problem!!!!! to sure......no problem.... As you know this would only make this my second attempt at a fondant cake and NEVER have I had to stack heavy tiers on top of one another which meant supporting the cake by inserting dowel rods. I was a mess with worry to say the least. Then on top of all of that, "if" I ended up pulling the whole thing off, I had to worry about carrying it down 3 flights of stairs, and drive pass 5,000 speed bumps to get out of our complex. "If" we made it that far, we were left with driving a half an hour in a manual transmission car, on the freeway to deliver the cake, so sure......no problem.....

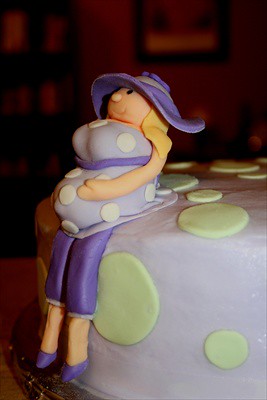
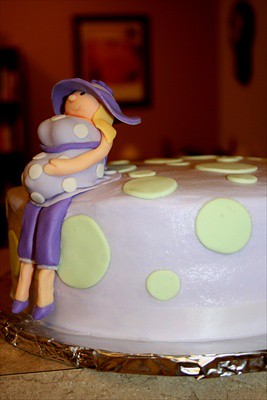
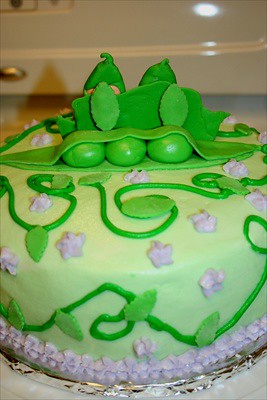
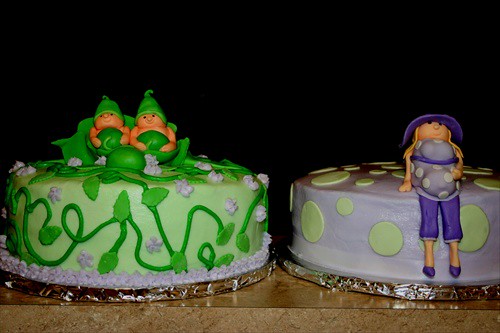
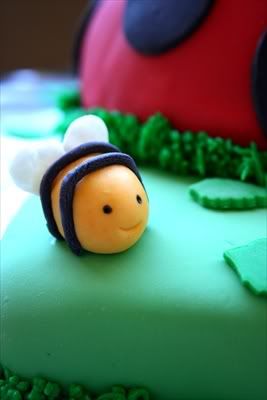
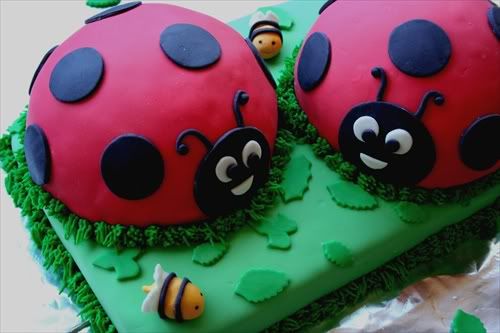
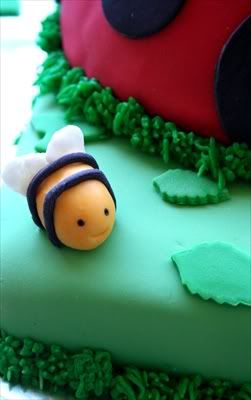
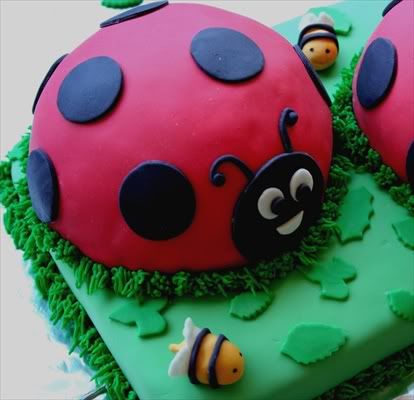
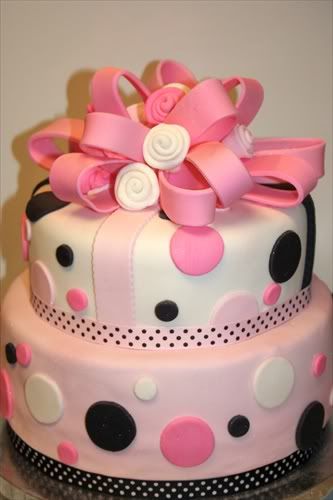
But I am happy to report all’s well that ends well. As you can see I pulled it off. Not to say that MANY "heart attack moments” didn't pop up along the way. My first issue, the fondant was sticking to my counter in the worst way. So I added powdered sugar BUT if I continued to add powdered sugar so that it wouldn't stick, it would quickly dry it out (okay and I'm sure the location of the central air vent in our kitchen blowing right on it didn't help matters), but I discovered you MUST make sure you surface is clean and I when I say clean I mean clean, clean. I think I was just wiping the surface thinking it was clean BUT you could feel powdered sugar residue left over from the previous rolling. Plus I needed to roll out a larger piece than I had ever previously done due to the fact that it was a tiered cake. After numerous attempts both cakes were covered. I'm not sure if it's just me but that is the worst part in my opinion. After the cakes are covered I totally love the decorating part of it. The next stressor was the adding of the dowel rods to give support when you stack the cake. It becomes so heavy with fondant that you don't want to have the bottom layer collapse when you place the top tier onto the bottom cake. First, you need to cut the dowels just right, about 1/16th lower than the cake is what I did, and you need to place them just slightly inside the perimeter of where the top cake will be placed. MAN, someone should warn you how stressful cake decorating can be; it was like me being a new surgeon operating for the first time. Will was my "assistant" handing me the dowel rods and cheering me on. Just watching yourself insert the rods into the bottom cake (and therefore destroying the flawless finish you just spent forever creating) and hoping you measured correctly is nerve wracking to the fullest extent. Next came placing the top tier onto the bottom, (or in layman’s terms - waiting for the bottom cake to collapse when you let go.....) My "assistant" had the important job of watching to see if any bulging occurred, and the first sign of it I wanted him to say "problem" and I would quickly remove the top as to save at least one half of the cake from total destruction. But guess what? It didn't happen!!! Next came Will wiping sweat from my brow, and me placing the center dowel rod down through the entire thing. If I made it through this I was going to celebrate with a nice margarita or two or three. Much to my surprise it went much smoother than my nerves would ever allow me to believe it could be. I had to just step back at that point and say "I did it”!!! I was so excited I think I cried happy tears. :) Sure there are a few minor flaws I have to work out and things I really would have been "better" with the cake but overall I guess for the stepping into to virgin cake baking territory (I’ve never taken a cake decorating class in my life) I didn't do too bad, did I?

Okay here is my list of questions for the fondant fans.....

* Other than the counter having some residue, is there anything else that could be making it stick? I am using the Marshmallow fondant recipe as seen here.

* I noticed that I got a few air bubbles even after I smoothed it out, any tips on how NOT to have that happen?

* What do you do it you accidentally mark the fondant after it is on the cake - like a finger nail scrap as you put the decorations on to the cake. Is there a way to smooth it out?

* How do I achieve a more realistic bow affect? I tried and still don't totally like how my bow creation turned out despite following an absolutley AWESOME bow making tutorial here (if you are a baker/cake maker you MUST check out there site for the most amazing software to assist you in running your business.)

* How long do you wait until you put ribbon on the bottom of the cake if you are indeed doing that so that it doesn't appear that it is bulging over the ribbon (and I also think I put it on too tight).

In the end, I did what I set out to do; I baked it, assembled it and transported it all in one piece, AND still lived to write this post. I guess it's true what they say, what doesn't kill you will make you stronger. I promise I’ll be back shortly with an actual recipe. Thanks to all who got this far in the post for my “therapy session”. You can all send me your bill in the mail.

Oh and on a side note - how many times can I say fondant and tiers in one post? I think I just set the record. :)

Photobucket


Friday, July 17, 2009

Oven Baked Parmesan Seasoned Fries

Photobucket

These fries ROCK plain and simple. Funny how one would still call them "fries" when really they are not "fried" in anything. Nope, these fries are too sophisticated for greasy oil, and much like a skinny swim suit model they prefer to be lightly oiled, slightly accentuated by a few minor spices and baked lying on a cookie sheet basking in the golden glow of the oven, BUT the one thing that sets these fries apart from the skinny swim suit model is that you can actually LOVE them instead of secretly hating them :)

When we were still in PA, my neighbors RAVED over them and I mean RAVED! They could smell the wonderful aroma coming from the windows in the spring and would say "Oh my gosh" someone is cooking something that smells delicious! I once made the mistake of calling them "healthy French fries" and very promptly these little fry guys lost their appeal— that is UNTIL they tasted them!!! A few of the "manly men" of the neighborhood were still the naysayers of the bunch and only relented in a feeble attempt to silence my pleas to try them. Then it happened, they liked them, no wait they LOVED them!!! They urged their wives to get the recipe. So I typed it up and before you know it that very familiar smell began filling the air on our tiny little street. I just KNOW you are going to love them too, but whatever you do, don't call them healthy!!! :)

Photobucket

Oven Baked Parmesan Seasoned Fries

NOTE: The amounts listed are for every one pound of fries. One pound of fries is the equivelant of appoximately 3 medium potatoes. (I just double or triple the recipe to fit within my needs).

Ingredients:

1 pound of medium russet potatoes (approx 3 medium potatoes)
1 1/2 TBSP of Extra Virgin Olive Oil
1/4 tsp Dried Thyme
1/4 tsp Dried Oregano
1/8 tsp Dried Rosemary
1/4 tsp of Garlic Powder
1/4 tsp of Old Bay Seasoning
2 TBSP of Kraft Parmesan Style Grated Cheese (I used reduced fat)

Directions:

*Preheat oven to 425.
*Wash and cut potatoes into 1/8ths.
*Place on a cookie sheet that has been lined with foil (I used Reynolds Release foil so that they will not stick, but you could also either use non-stick cooking spray or lightly grease the top of the foil with extra virgin olive oil).
*Mix all of the spices and the parmesan cheese in a small bowl.
*Place all of the potatoes (remember we are talking about one pound at a time) into a gallon size freezer bag, add olive oil and the parmesan cheese/spice mixture to the bag.
*Seal the bag and shake until the potatoes are evenly coated.
*Once thoroughly coated dump onto the prepared cookie sheet and spread in a single layer.
* Bake 30-45 minutes or until tender and lightly golden brown. (Baking times will vary depending on the amount of fries that you make and the size that you cut them). For the ones shown in the picture they were baked at 425 for 45 minutes.

ENJOY!

Thursday, July 16, 2009

Blueberry Streusel Muffins

Photobucket

I just have to get this out of the way - I'm not sure why but I keep wanting to call these Blueberry Streusel Muffins - Violet Beauregarde style. You may not know the name but surely you remember..... Photobucket she is the girl from Willy Wonka who turns into a blueberry, BUT the one advantage that these have is that you won't have to worry about swelling up like Violet because these muffins are low fat (although to taste it you would NOT even know it - they are that sinfully delicious)! In fact, I will go as far to say your scale might even thank you for them. My scale has been in so much trouble that I'm have been contemplating selling it on eBay for being so cruel to me. Why can't it just lie to me? Blogging and baking and being in a new area with new restaurant opportunities does NOT make for a happy ending to the weight loss story. Now before you all start deleting the blog from your favorites - HOLD UP, I'm not going all soft on you, this will NOT turn into a low fat blog - oh heck no, I will just throw a "healthy" or "low fat" alternative on here every now and then to make the "Diet Nazi" - a.k.a the hubs happy. Just make sure no one tells him when I cry out for full fat donations smuggled to me in unmarked boxes. ;)

This recipe has been adapted slightly from Weight Watchers and it's listed as being worth 3 points HOWEVER, I saw that there is a typo (they have listed 1 TBSP of sugar and it is really 1 Cup of sugar, as stated later in the recipe)therefore I'm not sure which way they based their points.

Photobucket

Blueberry Streusel Muffins:

Ingredients:
Muffins:
2 Cups of all purpose flour (in the past I used half white whole wheat and half all purpose flour to reduce the points even further)
1/2 tsp baking soda
1 tsp baking powder
1/2 tsp table salt
1 large egg
3/4 Cups sugar
3/4 Cup reduced fat sour cream
1 tsp vanilla extract
1/4 cup skim milk
2 Cups of Blueberries - washed and picked over

Streusel Topping:
1/4 Cup of all purpose flour - I used slightly more than 1/4 cup
1/4 Cup of Sugar - I used slightly more than 1/4 cup
2 TBSP butter

Directions:
Muffins:
*Preheat oven to 375.
*Place muffin liners in a 12 hole muffin tin - I actually got 14 muffins which also could possibly affect a slight reduction in points.
* In a large bowl, combine 2 cups of flour, baking soda, baking powder and salt; set aside.
*Using an electric mixer, beat egg with 3/4 cup of sugar in a large bowl until light and fluffy. Add sour cream and milk and beat until thoroughly combined; blend in vanilla extract.
* Add mixture with flour, baking soda, baking powder and salt. Beat until smooth.
* Fold in blueberries (make sure you coat them with flour so that they don't sink to the bottom of your muffin) and fill each muffin liner about 3/4 full; set aside.

Streusel Topping:
*Combine remaining 1/4 cup each of the flour and sugar. Pour in melted butter and combine with finger tips (if it is too moist add equal parts of flour and sugar until it looks like crumbs).
*Divide crumb mixture over muffins.
*Gently press into top of the muffin batter with finger tips.
* Bake until slightly golden and a toothpick inserted in a center of a muffin comes out clean, about 30 to 35 minutes. Cool in pans for 10 to 15 min and then transfer muffins onto racks to cool completely.

Enjoy!

Photobucket


Blueberry Muffins on Foodista

Wednesday, July 15, 2009

Super Easy Cream Cheese Brownies and the tale of brownie bribery....

Photobucket

If we all take a moment of silence you will hear the faint sound of a woman crying, probably all balled up in a corner of her home in a small town in Pennsylvania. That folks would be my mother in law and she would be sulking due to the fact that she knows that I made these brownies all the way on the other side of the United States and she can't eat a one of them (we moved away in January, so I’m sure she has suffered from 6 months of brownie withdraw)! You see these are my mother in laws FAVORITE brownies - like EVER!!!! They are so much her favorite in fact that she once used them to bribe me in order for her to watch my very cranky, needy, hyper, going through the terrible two's toddler while I went into the hospital to have my son (okay so I am a bit dramatic - I know in my heart she would have watched her without me making them), but I knew that there would be some incident of pooping in the bathtub that would send her over the edge unless there was something to keep her in the house - hence the brownies. I quickly learned that these brownies much like superheroes have some sort of power to make grown adults weak in the knees, so of course I did what all good bakers do and decided to use it to my full advantage. I came up with the genius idea that baking a HUGE pan of brownies for the nurses would give me the edge over the "other" patients when it came to midnight snacks and extra visitors during my hospital stay. Oh, who am I kidding I wanted to make sure I was first in line to get my epidural well ahead of all others! :). So with one pan of brownies on the kitchen counter and one pan of brownies in hand, Will and I ventured off to the hospital, and much like I expected the nurses went gaga over them. If I remember correctly the pan of brownies were gone long before the first signs of hard labor pains began. The nurses loved me for them and so did my mother in law!

Lesson of the day folks, the best bribery =baking brownies, and not just any brownies, THESE brownies! I hope you enjoy them as much as we do, and Sandy I promise I will have a pan full of these waiting at the airport with Will. Just know in advance there will be diapers to change, a sink full of dishes to wash and ten loads of laundry when you get here. Oh and did I mention there will be brownies? :)

Photobucket

Super Easy Cream Cheese Brownies:

Brownies:
1 Package of Betty Crocker Original Supreme brownie mix
1/3 Cup Water
1/3 Cup Vegetable Oil
2 or 3 Eggs

Cream Cheese Mixture:
1 package of cream cheese softened – 8 oz
1/3 Cup of sugar
1/2 tsp of vanilla extract
1 egg
1/2 Cup of Semi-sweet Chocolate Chips

Directions:

Brownies:
* Heat oven to 350.
* Grease a 13 x 9 inch pan.
* Stir brownie mix, chocolate syrup (included in the package), water, oil and 2 eggs for fudge like brownies or 3 eggs for cake like (I used 2 eggs).
*Mix until well blended and spread into pan.

For Filling:
* Beat cream cheese in medium bowl or mixer until smooth. Gradually beat in sugar, vanilla and one egg until well blended.
* Pour (or spoon and spread) cream cheese mixture over brownie batter in pan. Cut through mixture with a knife several times (I go zig zag up and down the pan and from side to side as well until you reach a marble affect).
* Sprinkle with chocolate chips.
* Bake 35 to 40 minutes or until cream cheese mixture begins to brown and toothpick inserted in brownie2 inches from the side of the pan comes out clean or almost clean. Cool completely. Store covered and in refrigerator if desired.

If you like these, don't forget to vote for these on Foodie Views of the Day!!!!

Enjoy!


Photobucket

Monday, July 13, 2009

Fondant doesn't "bug" me anymore - my very first fondant cake!

Photobucket

Fondant fears be gone!!!! Yep, you are reading this right - I did it, I finally faced my fondant fears head on and made my very first official fondant cake this weekend. Let me tell you at first I was ready to throw in the towel and go back to what I know best - butter cream BUT I knew that in my heart of hearts IF I ever in my wildest dreams want to open any type of baking business that I MUST start to work with fondant. So that is just what I did!

I didn't want to buy that pre-rolled type, as I've read that it pretty much tastes like the package that it comes in (yeah that good huh?), so I decided if I was going to do it, I was going to go all in or nothing and I made homemade marshmallow fondant myself. I found a recipe and quick tutorial here. I was pretty surprised how quickly it all came together and that the clean up wasn't as horrific as I once thought. As for working with the fondant, lesson learned is that you can read and read and read about it BUT you don't really know a darn thing until you actually try to do it yourself. I had a few moments where regardless of using a huge about of both cornstarch and powdered sugar it was STILL sticking to my counter (que the "I HATE THIS!, I'M GOING BACK TO ICING!" moment). I quickly learned that it works better if during the “rolling it out” process you roll it out a bit in one direction, flip it, sprinkle your counter again and begin rolling out the other side. Once I actually had the cakes covered I fell in love with fondant. Decorating it and seeing it all come to life was so cute! I would love to have the "professionals" give me their opinions of the cake and what I could have done to make it even better. Here are the questions that I have for the fondant pros:

How do you make sure that they are no flaws in the fondant - no creases, no dimples, no stray finger nail marks as you smooth it out and what do you do if you happen to have one once it is already on the cake?

How do you use enough icing base under the fondant but yet make sure it doesn't come out under the fondant when you are smoothing the fondant onto the cake?

When you are putting the cake together, do you torte the cake (even if it is a small cake) so that there is plenty of icing along with the marshmallow fondant?

Is there a way to get the fondant to look shiny after you have it all in place? I just used a pastry brush to brush off all of the excess powdered sugar after the entire cake was finished.

Any other tips or suggestions? (I am sure I will think of more once I post this and if so I will come back and edit)

Without further ado I introduce you to the finished product. Drum roll please........

Photobucket

I used a regular 13x9 cake for the base and the Wilton Sports Ball pan set for the lady bugs (instead of putting the pans together to form a ball, I kept them separate). I used various fondant cutters and flower cutters for the shapes and leaves as well as using Wilton decorating tips to create various looks on the lady bugs. But my favorite part was using the fondant to make these little bees. I mean seriously how cute are they????

Photobucket

Thanks for looking and I appreciate any and all feedback that you can provide to me!

Enjoy!

Photobucket


Friday, July 10, 2009

Not the same "chip" off of the old block - Chocolate Dipped, Chocolate Chip Cookie Bites

Photobucket

I won't bore you with a lot of blah, blah, blah about this recipe. The fact of the matter is, I should be cleaning my house but instead I'm baking and blogging. I have been brainstorming this for the past few weeks, and I'm actually still NOT totally thrilled with the outcome, taste (HECK YES THEY ARE DELICIOUS!!), but as for appearance I would like it to look, I don't know - cuter? I would like to have them on a lollipop stick, then dipped and use all kinds of decorations (think sprinkles, nonpareils, etc, etc), but like I said I'm supposed to be elbow deep in domesticated bliss (laundry, dusting and cleaning toilets), but instead I'm baking, so for now this is what I had time (or lack thereof) to pull together. Hope you enjoy them as much as I am!!

Photobucket

Ingredients:

3 cups of all purpose flour
1 tsp baking soda
1/2 tsp salt
1 cup of unsalted butter
1 cup of light brown sugar
1/2 cup of granulated white sugar
2 large eggs
2 tsp of pure vanilla extract
10 ounces of semi-sweet chocolate chips
Wilton Candy Melts in both chocolate and white chocolate
Candy decorations of your choice (optional)

***NOTE*** This recipe will make quite a few cookies so I cut it in half for this project.

Directions:

*Preheat oven to 350.
*Combine first three ingredients in a bowl and set aside.
*In a large bowl, cream together butter and both sugars with mixer until fluffy.
*Add eggs one at a time and beat well.
*Mix in vanilla
*Add dry ingredients and combine well.
*Fold in chocolate chips.
*Generously grease a mini muffin pan
*Place one scoop of cookie dough into each mini muffin cup - I used a cookie scoop, but you can also use approx 1 heaping tsp full of dough (as I said the muffin cup will be a little more than 2/3 full)
*Bake for 10-15 minutes or until lightly brown. Allow cookies to cool for 5 minutes, and then transfer to a wire rack.
* Once the cookies have completely cooled, melt the Wilton Candy Melts (see directions for melting chocolate here.
*Dip the top of the cookie into the chocolate and garnish with your choice of decorations - another flavor of chocolate, candy decorations, frosting - you're the boss - let your imagination run wild!!!
* Refrigerate just long enough (approx. 5 min) for the chocolate to set.

ENJOY!!!!

Photobucket

Monday, July 6, 2009

Extreme "bakeover" -Pineapple Banana Bread .

Photobucket

Bear with me for a moment. I feel the need to apologize to my bananas. I really had intentions of eating you right away when I first laid eyes on you at the grocery store. I thought for sure someone in my family would gobble you up right away, but when it didn't happen I saw how your ego (and peel) became bruised sitting over there on the counter all by yourself. Today I just couldn't take it anymore. I knew I had to save you from yourself (and my unappreciative family). So I did the only thing that I could think of, I grabbed your friend canned pineapple, my recipe and the rest as they say is history. You have become banana pineapple bread and much like a high school ex boyfriend (or girlfriend for my male readers), I didn't realize how much I liked you until you transformed into something much more beautiful and desirable then you once were. My family is TOTALLY appreciating you and enjoying you now!

Okay now where were we? Oh I was going to give you all the recipe for this wonderful, out of this world, delicious, moistest bread like EVER! I used to buy bread like this at a specialty store, but for $8.00 a loaf? Are you kidding me? Some might say I'm cheap, others may call it frugal but whatever the case may be, I knew I had try to bake something similar myself. It wasn't just similar - it tasted like the same exact thing! I have been making this for a while and it remains one of my families all time favorites.

Photobucket

Pineapple Banana Bread

Ingredients:
3 Cups all-purpose flour
2 Cups sugar
1 tsp salt
1 tsp baking soda
1 tsp ground cinnamon
3 eggs
1-1/4 Cups vegetable oil
2 tsp vanilla extract
1 can (8oz) crushed pineapple, drained
2 Cups (4 to 5 medium) mashed ripe bananas

Directions:
In a large bowl, combine the flour, sugar, salt, baking soda, and cinnamon. In another bowl, beat the eggs, oil and vanilla; add pineapple and bananas. Stir into the dry ingredients just until moistened. Pour into two greased 8-in. x 4-in. loaf pans.

Bake at 350 for 60-65 minutes or until golden brown and a toothpick remains clean when inserted into the center. If you notice that the tops are starting to get browned, yet the tooth pick does not come clean, cover with a piece of foil and continue baking to prevent top and the sides from getting too dark. Cool for 10 minutes before removing from pans to wire racks.

Yield: 2 loaves.

ENJOY!

Photobucket

Sunday, July 5, 2009

No "shroom" for dessert - Ravioli di Portobello

Photobucket

I feel like I have become VERY domesticated this weekend. First, I made homemade ice cream and tonight I made my own pasta ravioli's. Will wanted to try making ravioli for awhile, but I doubted my ability to roll it out that thin and smooth without it tearing or sticking to the counter. I had a taste of doing just that a week or two ago when we tried our hand at making pierogies, and while they tasted totally delicious they were not at all worthy of pictures (hence the reason they didn't make it to the blog). I knew after that, that if we were going to attempt ravioli's that we needed a pasta maker. So, I picked one up at while at Bed, Bath and Beyond last weekend. It was actually less complicated then I originally expected it would be, although Will was the one using the hand crank while I just fed the pasta dough through. What a gentleman!!! Now that we know we can do it, we are anxious to try many other variations on pasta and ravioli. I'd love to hear some of your favorite pasta dishes as well! Oh and by the way - as the title implies, this was so good there was no room or should be say "shroom" for dessert!

Photobucket

Ingredients:

Pasta Dough:
2 1/2 Cups of all purpose flour
3 eggs
Water - enough to make ball of dough smooth and no longer sticky (I think I used about a little less than a half cup)

Filling:
2 large Portobello caps - vents cleaned out
1/2 yellow onion
1 tsp of minced garlic
1 TBSP of butter or margarine
5-8 leaves of fresh cilantro
1 tsp Oregano
1/2 tsp salt

Sun Dried Tomato Sauce:
2 cups milk
1/4 cup butter
1/4 cup flour
8 ounces smoked Gouda cheese
2 sun-dried tomatoes, chopped (2 to 3)

Directions:

Pasta Dough:
Pour flour into mixing bowl and make a "well" or pit into the center.
Break eggs into the well.
Slowly blend the flour and eggs until they are well blended.
If the mixture is wet, slowly add more flour; if the mixture is dry, slowly add a little water. (You do not want the dough to be sticky)
Continue kneading until the dough has a consistent color and texture.
Form the dough into a mound shape and place on a floured table or countertop. Cover with a damp towel.
Allow the dough to rest for 10-15 minutes in order for the ingredients to blend together.
After the dough has rested begin form ravioli's either by hand or using a pasta maker.

Filling:
Finely chop mushrooms. Peel and finely chop onion. Melt butter in a skillet and sauté the onion for approximately five minutes or until transparent. Add mushrooms, garlic, cilantro and oregano and salt. Stir-fry over high heat for about five minute so that all liquid is evaporated. Reduce heat and cook for another five minutes. Remove from heat and let mixture cool. Place mixture inside the dough and create ravioli's. Place ravioli's in boiling water and boil for approximately 20 minutes until done. Melt the remaining butter. Pour over the ravioli, mix and serve.

Sauce:
Heat milk and butter in a sauce pan until the butter melts, whisk in flour and cook over medium heat for about 3-5 minutes until thickened. Add 8 oz smoked Gouda cheese (I think the next time I will only use 4 oz of smoked Gouda. Eight ounces made it a VERY thick sauce) and 2-3 chopped sun dried tomatoes. Mix on med-low heat until cheese is melted. Pour over mushroom stuffed ravioli.

ENJOY!
Photobucket

Ice Cream with "appeal" - Homemade Banana Ice Cream

2
Here it is, my very first ice cream made with my brand new Cuisinart ice cream maker and I couldn't be happier! Banana ice cream is Will's all time favorite, and as I mentioned before he was such a naysayer when it came to getting an ice cream maker (he thinks that I will make 2 flavors and the novelty will wear off - eye roll), that I thought I better try to win him over with his favorite flavor. As I placed the ingredients into the machine Will says "Oh honey, how do you feel? This is your dream come true." - again insert eye roll here - he is such a man. Yes it WAS a dream because I was going back and forth about an ice cream maker for YEARS. Once he started to see the liquid mixture beginning to transform into actual ice cream some of his reluctance began to fade. He said "Oh, it's looking like ice cream!". When it was all finished and before I put it into the freezer for a bit, I gave him a taste and he said "Oh my gosh, this is the best thing you ever made!" I knew at that moment I had him hooked! As I told Katrina at Baking And Boys, I now only have 1,534,000 more flavors to make before he completely eats his words about me buying an ice cream maker! It really is delicious. Hope you enjoy it as much as we do!

1

Homemade Banana Ice Cream Slightly adapted from the recipe found here on Cooks.com

Ingredients:

2 c. heavy whipping cream (1 Pint)
1 cup whole milk
1 inch split vanilla bean (optional) - I did not use the vanilla bean, simply because I did not have one on hand.
2 eggs (whole)
1 c. sugar
1 teaspoon vanilla extract
2 peeled bananas (medium)

Add whipping cream, whole milk, and vanilla bean in a pan and simmer for 15 - 20 minutes. Stir constantly and do not cover.
In a separate bowl mix the eggs and sugar until well blended.

After the cream and milk has been simmering, take out the vanilla bean (if you are indeed using one) and add the egg/sugar mixture to the pan, maintaining the simmer and the stirring.

When this begins to thicken (approx 3-5 minutes) remove from heat, cover with plastic wrap (tight to the mixture), and put in the fridge until completely cool.

The original recipe asks you to dice the bananas and then put the entire mixture into a blender but with two kids on a holiday who has that kind of time? So I just added 2 ripe mashed bananas to the mixture when it was completely cooled.

At this point place mixture into the ice cream maker and process according to manufactures directions (for my Cuisinart, I let it spin for 20 min). During this time you could add in extras such as chocolate chips or whatever your heart desires, but Will wanted just plain old banana ice cream so I didn’t add anything additional.

Mine was the consistency of soft serve ice cream when it was done in the machine - which was still great, but since I knew I wanted to blog it, so I put it into an air-tight container and placed it back into the freezer overnight (I don't think you would really need to wait longer than a few hours though, I just ran out of time yesterday). Today as you can see in the picture, it is the consistency of hand dipped ice cream.

It will make just less than 2 quarts. Mine is a 1.5 quart maker and I didn't have any problems with it all fitting in.

ENJOY!!!!

Photobucket