Saturday, October 26, 2013

Pinwheel Halloween Sugar Cookies

 photo Blog1_zps6ecdba37.jpg

Pinterest....oh how I love thee.  I remember the days when my children were babies and during late night colic sessions, I would watch nothing but infomercials over and over and over again.  After seeing spray on hair for balding men for the 555,000 mind numbing time, I would begin to count ceiling tiles or try to find faces in the wood patterns on my furniture.  For you Moms (and Dads) just starting out consider yourself VERY lucky with smart phone technology and Pinterest! Feel blessed that you have these things to entertain and educate you while having late night party time with your little one.  Those days have LONG passed for me, however my body hasn't realized it yet and as I approach the second half of my life, I've had the pleasure (insert heavy doses of sarcasm) of developing the curse of middle of the night insomnia.  I can not begin to tell you how thankful I am for my iPhone and the Pinterest app!  I have learned to do so much from that site!  I have learned how to clean shower doors with dryer sheets, how to iron a stain out of my carpet, how to get rid of fruit flies, how to make about a trillion DIY things (including but not limited to cake pedestals from Dollar Tree candle sticks and plates), and how to entertain my children by making slime. The list goes on and on and on and on.... but the one thing I am REALLY grateful for is this sugar cookie recipe that I found on there!  It is quite possibly the best sugar cookie recipe that I have EVER tasted.  If you aren't into soft, fluffy, melt in your mouth sugar cookies, then this recipe is not for you.  It was easy to mix up, easy to work with and I probably didn't even need to refrigerate it prior to baking it!  Bonus points!  When it comes to cookie making, who wants to have to wait hours and hours prior to baking them? Not this girl over here! They would be great to use as any holiday "pinwheel type cookie", cookies on a stick, decorated cookies, drop cookies (rolled in more sugar of course!), and even cut out sugar cookies!  What a great treat these would be for your upcoming holiday party!  I can't wait to see what you've done with your own variation of this recipe!  Follow me on Instagram (@playwithsugar) or Twitter (@playwithsugar) and don't forget to tag me so I can see your work too! Happy Halloween!

 photo afef5344-adff-4399-9b7c-77ea4589b7f9_zpsc8c2cd9a.jpg
Pinwheel Halloween Sugar Cookies
(thick, soft, easy sugar cookies)

Ingredients:

1 Cup of unsalted butter
2 Cups of sugar
2 Eggs
3 teaspoons vanilla (I used J.R. Watkins Double Strength Vanilla.  If you haven't tried this you really should!)
1 Cup Sour Cream
1 teaspoon salt 
2 teaspoons baking soda
5 1/2 Cups Flour

Instructions:

In mixer, cream together butter and sugar.  Add sugar and vanilla.  Next add sour cream. Combine salt, baking soda and flour and add to the mixture.

After dough is thoroughly mixed, divide dough in half. 

Keep half of the original color and set aside. Place the other half back into the mixer and add orange food coloring (amount to your liking).  I used Wilton Icing Color in Orange.  Mix on medium speed until all of the coloring has been incorporated throughout. 

Roll out original dough (the one not colored) on a floured surface. I was very precise and cut and measured an exact rectangle (or square if you're fancier than I am at rolling!). I saved any scraps for cookies that I will tell you about a little later. Next, I did the exact same thing using the orange dyed dough.  The only difference is I rolled this out on floured pieces of waxed paper (this made it MUCH easier to transfer on top of the original dough). 

Once I had both pieces pretty much the same size, I flipped the orange dough on top of the original (basically stacking the orange on top of the white).  

Begin rolling the dough tightly until it is all rolled up and in the shape of a log.

Lightly brush with water and roll into sprinkles of your choice. (I found it best to dump out all of my sprinkles onto a cookie sheet and then roll my cookie dough on it in order to try to contain the mess. Gently apply pressure while rolling to make them stick.)

I covered the decorated roll with saran wrap and then placed it in the refrigerator overnight. (You really only need it in the refrigerator for an hour to an hour and a half, but I was short on time so I baked mine the next day.)

Prior to baking, remove roll from refrigerator and slice into 1/4 inch slices and place on a parchment lined cookie sheet.

Bake in a 375 degree preheated oven for 7-8 min.  Cookies WILL looked under baked, but this DOES NOT mean that they aren't done. RESIST THE URGE TO BAKE LONGER!  I made the mistake (on my first batch) of thinking they needed to stay in longer and they got a little too brown on the bottom for my liking. They WILL be pale in color and no browning anywhere.  (Remember these are super soft, thick cookies and leaving them in longer will not allow you to achieve that result.)

VARIATIONS: 
 
Some of the cookies I placed on a stick to form a cookie type lollipop.  Just place the stick under the cookie prior to baking and voila!

As for the other cookies, remember those scraps I talked about?  I took the original (white) cookie dough and rolled it out into a small rope like shape.  Next, I did the exact same thing with the orange.  I stacked one rope on top of the other and began two twist the two colors together (not braid, just twist).  Lastly, I began to coil it around using one end as the center wrapping the rest around it.  I apologize that I don't have any photos as this was a spur of the moment attempt to not waste dough. 

 photo Blog2_zps77782ee8.jpg

 photo 650c708d-5c46-4061-beef-90862424dbbd_zps71558539.jpg

 photo df537a54-ad32-4e9d-9db1-5c2df736aecf_zpsb203fc72.jpg

 photo 4d035550-7a7f-435d-b964-b3d259808ad1_zps1ee80fdb.jpg

 photo 9550fac2-2c32-4568-b5f9-2142bbbc02aa_zpsb524a36d.jpg

 photo Blog4_zpsb38d3e0b.jpg

 photo Blog8_zps6b942f8c.jpg


Monday, October 21, 2013

Better Than Sex Cake

 photo Blog6_zps742a54da.jpg

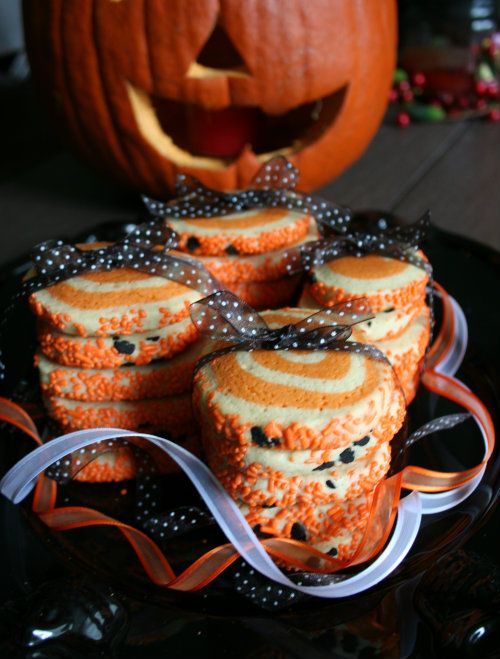
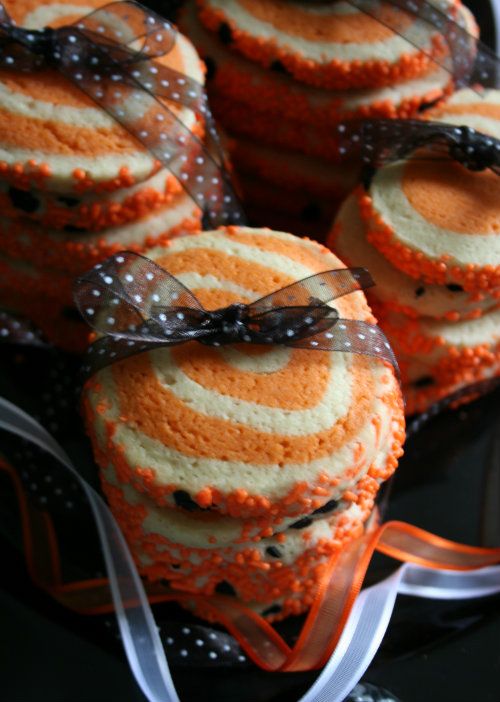
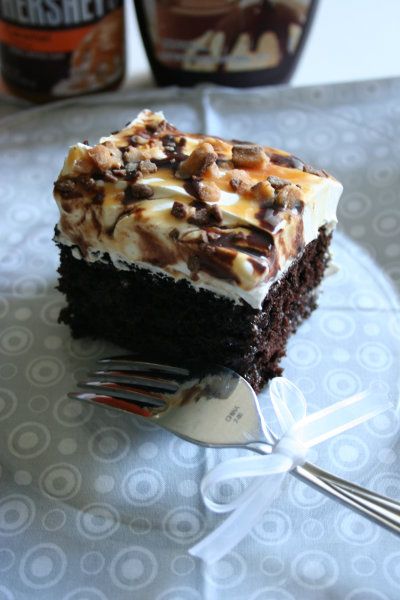
"Let's talk about sex baby, Let's talk about you and me. Lets talk about all the good things and the bad things, that may be. Let's talk about sex"..... CAKE!

Gosh, I'm hoping this doesn't get rated X or filtered because of its scandalous name but it is what it is. I didn't name it but I do LOVE it! Get your mind out of the gutter, the cake NOT the name!

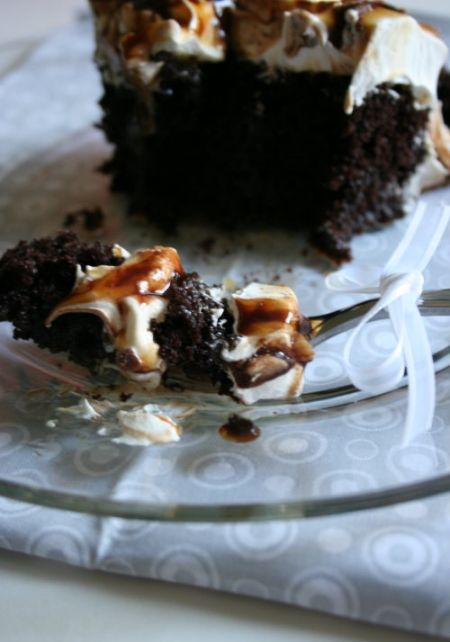
Better Than Sex Cake, Almost Better Than Sex Cake,  Better Than Anything Cake.  This is a cake by MANY names.  If you are under 18, over 70 or if you are speaking to your parents or children that fall into the aforementioned age category, you should probably just go ahead and refer to it in the "better than anything" form. We called it "Better Than Sex Cake" (unless we are asking the kids if they want a piece). Is it really better than sex?  Well that my dear readers is up to your taste buds and opinion! According to this website (which I also love by the way!) it says that this cake is "better than sex" because "you can enjoy if for more than 30 seconds, if you're not satisfied you can have another piece. Cake doesn't care if you share, and it won't lead to pregnancy, divorce or alimony".  It's seriously one of the most divine, amazing, yet super easy desserts that I have EVER had the pleasure of eating (and making)! If you've ever had it, I'm sure you agree and if you never had, WHAT THE HECK ARE YOU WAITING FOR?  You MUST make this. Seriously. Like NOW!

 photo 3fd8ba9c-07ba-4fd1-8a03-c9b5a24ceb13_zps8adf213a.jpg

Better Than Sex Cake

Ingredients:

1 Box of Chocolate Cake Mix (I used Duncan Hines Dark Chocolate Fudge Cake Mix)
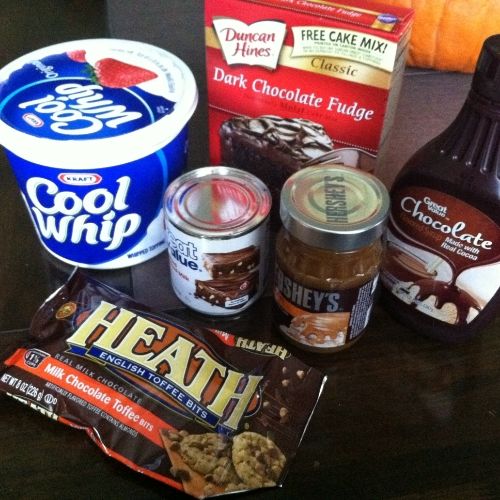
1 can of sweetened condensed milk (14 oz)
1 jar (14 oz) of caramel ice cream topping (I used Hershey's Caramel Topping)
1 package of Skor or Heath bits (8 oz) or 3 bars of either Skor or Heath finely chopped.
1 container of Cool Whip (I used the 16 oz container)
Small bit of Hershey's Chocolate Syrup for garnishment. (Use as much or as little as you'd like!)


Instructions:

Prepare and bake cake according to the box directions.

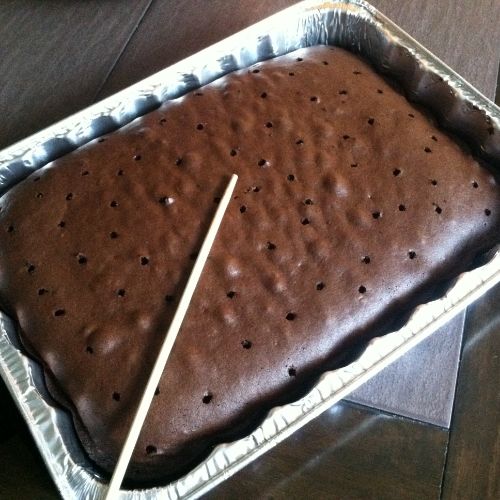
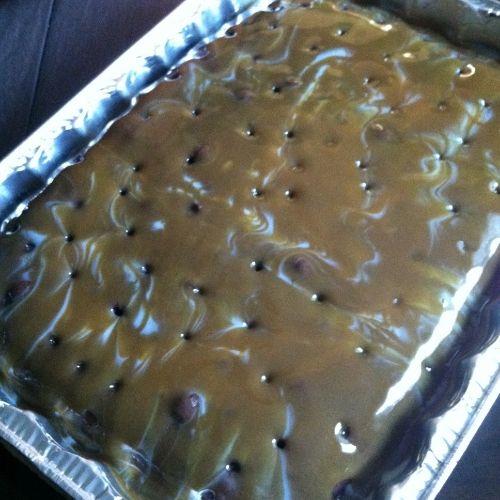
After the cake is fully baked, immediately pull out of the oven and poke holes randomly over the entire surface of the cake using a fork, end of a wooden spoon or in my case I used the end of a chopstick.

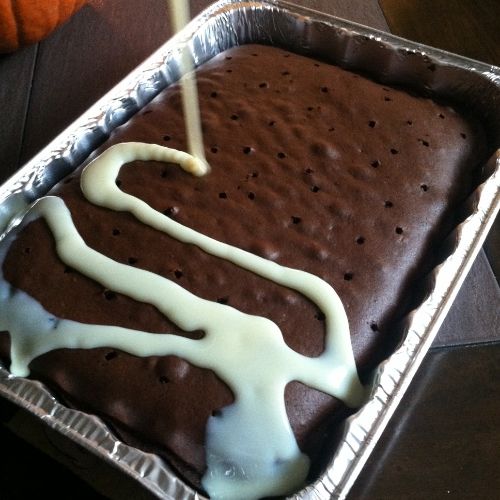
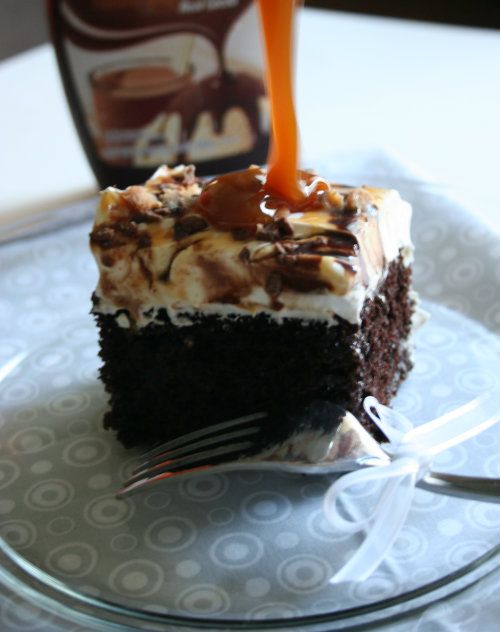
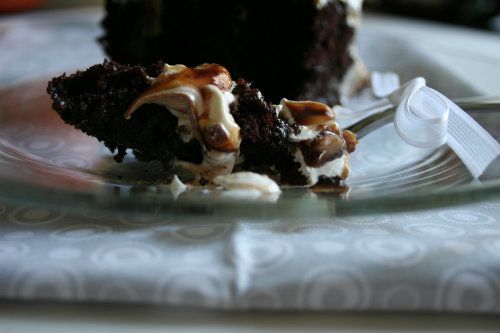
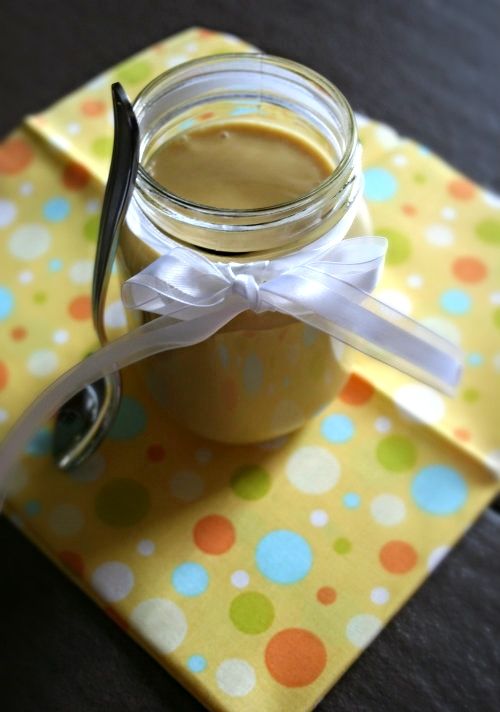
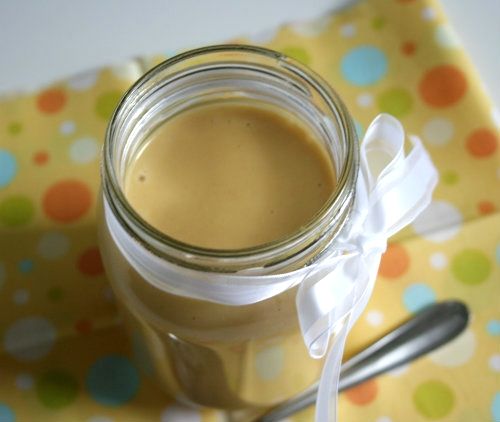
While the cake is still hot, pour the can of condensed milk over the top of the entire cake. Do the same with the caramel topping (reserving about 1/8 for garnishment on the top of the finished cake)

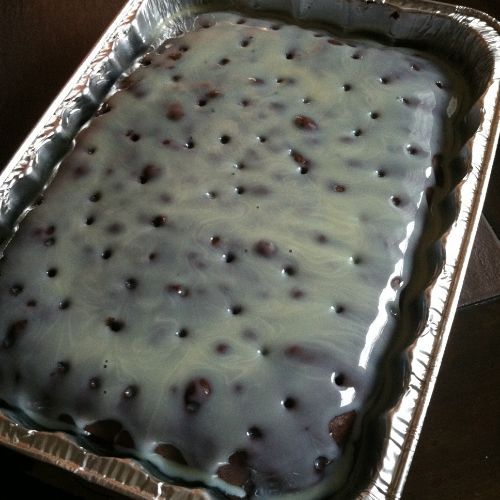
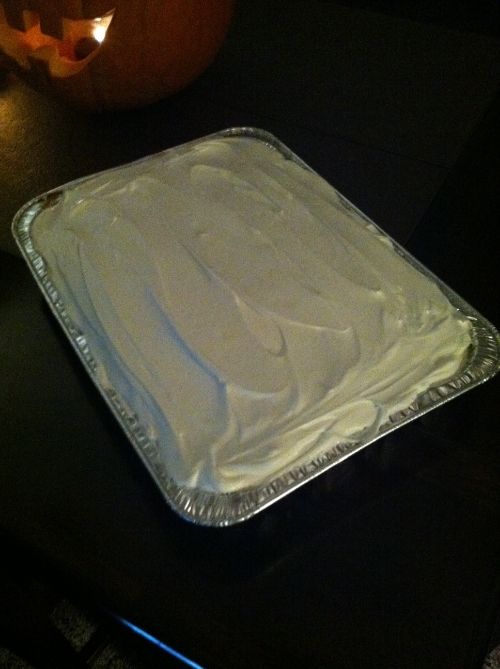
Place cake in refrigerator to cool ( Approx 2 hours or longer)

Once cake has completely cooled, spread Cool Whip over the entire cake.

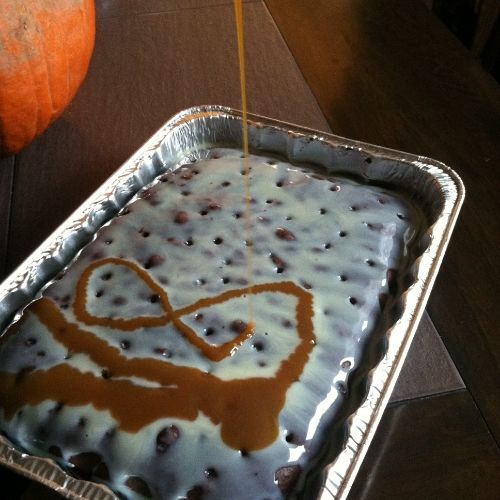
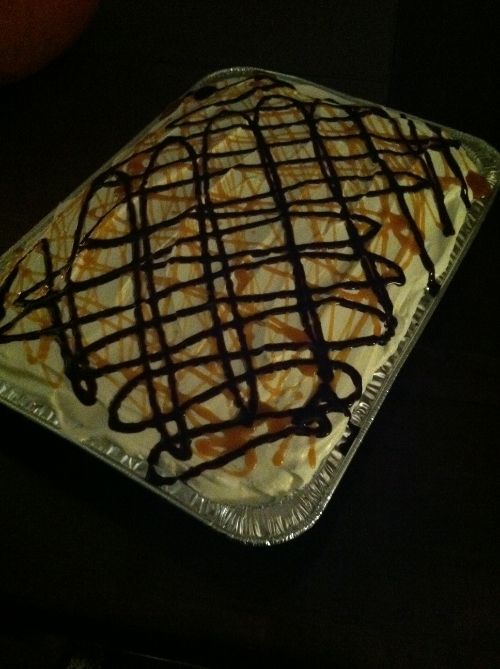
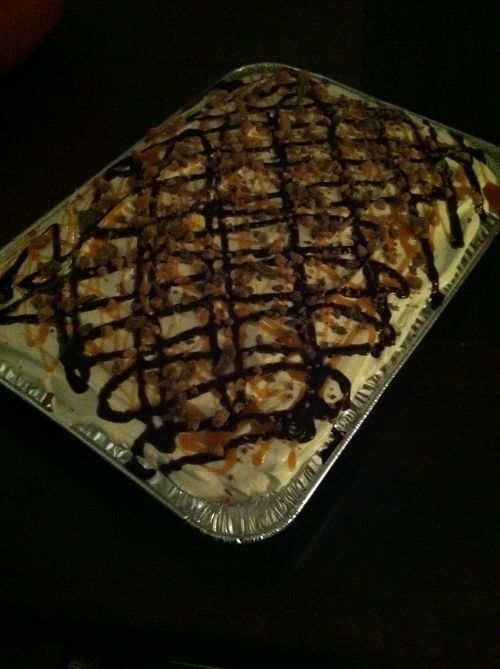
Drizzle reserved caramel topping in a zig zag motion over the top of the cake.  Repeat the same process with the Hershey's Chocolate Syrup. Garnish with the Skor or Heath Bits (I used about 1/3 of the bag)

DIG IN!  ENJOY!


 photo e1c52b4b-b837-4d5f-8b4c-ef00327b0a46_zps41fc972f.jpg

 photo 3f5717ae-310c-4938-ba32-755c04e6b71e_zps32d271ff.jpg

 photo 140aead4-f63e-4302-8456-2dddf3d3248c_zps0a915a72.jpg

 photo 3b30e0db-c371-427b-b8c9-0e995344856d_zps1272ca11.jpg

 photo 11f19ec0-e004-4263-bb32-6d8b5a72df1a_zpsa5986d64.jpg

 photo 7aeadf06-dc8e-42d5-8466-3519bcfbbd2f_zps548112b1.jpg

 photo 0de6cef8-8fd2-470c-8f88-4ae60e224588_zpsa79fdbb9.jpg

 photo 93f3a416-d42b-4f43-b29b-22b4da82de8c_zps6fe08c5b.jpg

 photo 2c269bce-53ed-4707-a1e8-1745595acf51_zps7630e140.jpg

 photo 7851fc00-cd20-42fc-8a08-6a5d768a4ea6_zps475cb314.jpg

 photo Blog2_zps3bae6065.jpg

 photo Blog4_zpsbf9bf14e.jpg


Saturday, October 19, 2013

Homemade Honey Mustard Salad Dressing

 photo 71ca634d-1020-4c6e-a238-864ed345d68f_zpsb9db2395.jpg

I am totally in love with Ken's Honey Mustard Dressing!  Then why would I want to make my own you might ask?  Well.... have you ever gone to the grocery store with high hopes of buying something, only to get there and find the shelf bare?  This was the fate of my latest shopping trip, so I'm pretty sure you can imagine the disappointment I felt when this happened!  I frantically scrambled around digging towards the back, hoping to find the one misplaced bottle that got pushed to the side.  No luck.  I thought about getting another type of dressing, but honey mustard pairs the best with the copy cat version of Red Robin's Crispy Chicken Tender Salad that we were making for dinner last night.  What's a girl to do when faced with this kind of life altering predicament? Easy answer.... make your own! I went to work in the middle of the aisle looking for and pinning recipes on my Pinterest board.  I got home and went straight to work and what I ended up with is pretty darn close to the Ken's brand dressing!  The only difference is the consistency.  The homemade version is not as thick and upon closer inspection of the Ken's, I see there is Xanthan Gum in it.  The next time I might add a bit of this to help thicken it up, but that is a HUGE maybe.  It was still very, very good without it.  Thanks to the way this one turned out, I'm now on a mission looking for other homemade salad dressing recipes to try! I can't wait to see what others we come up with!

 photo 01870aa2-c183-449b-9ae2-196efa93195d_zps9efd1877.jpg

Homemade Honey Mustard Salad Dressing

Ingredients:

1 1/4 Cup of Mayonnaise (I used Hellman's Real Mayonnaise)
1/2 Cup of Dijon Mustard (I used French's brand Dijon mustard) - I will say a 1/2 cup will make the dijon flavor more distinct than the Ken's.  If this isn't to your liking, start with 1/4 cup and increase to your taste.
1/2 cup of honey.
1/4 tsp of salt
3 teaspoons of sugar

Instructions:

Place all ingredients in a bowl or tall measuring cup and blend (or whisk) until smooth and creamy and free of lumps.  I used my Cuisinart Immersion Blender and it made the process super easy and was done within seconds!  (I absolutely LOVE that thing!)
Use for a salad dressing and also great as a dipping sauce as well!

 photo c9c7f9f3-c4a4-4e62-9cc1-3cf2748ac833_zps593c0461.jpg

 photo ecace380-48a1-4122-bfe3-9aa1eebe2862_zps7d91ece9.jpg

 photo bacf5d4b-c787-44ab-ad25-2529179c4faa_zpsdd1b27c5.jpg

Wednesday, October 16, 2013

Homemade Hamburger Rolls

 photo 0c7c1e66-9b68-447b-9de5-031a979d1ec2_zps7b1d79d7.jpg

I guess we could call them buns, I mean after all they technically are.  But to me "buns"  (when it comes to food) just sounds.... I dunno.... gross!  Haven't we been over this before where it comes to my weird hang up with food aversions due to the name attached to them?  For example in this post when we discussed my refusal to call them cake "balls' and instead I insisted you call them "bon bons".  Okay, so some things obviously didn't change and won't change no matter how long I'm gone from blogging.  Regardless of what you want to call them, you can call them amazing and I'd be okay with that.  I mean how can you go wrong with homemade rolls? Plain and simple.... ya can't. There's just something about a fresh roll that can't be duplicated in prepackaged ones. We used ours for cheeseburgers and I was just telling Brian how freakin' fantastic they'd be as a deli sandwich as well.  He and Auden even enjoyed them with just a little bit of butter on them!  While cooking them, the house smelled like a bakery and I admit, it made me feel like I was channeling my inner 1950's housewife by making them from scratch.  This was the first time using this recipe or even attempting to make a homemade roll from scratch, so I will confess that I'm no expert when it comes to it.  It's a work in progress and the one recommendation that I will tell you is that the next time I make them, I will be dividing them into smaller portions and making smaller rolls.  The original recipe said to divide the dough into 8 pieces which made rather large rolls which were still delicious but quite substantial in size. Anyway.... enough of this jibber jabber... let me show you my buns! ;)

 photo e48df5ae-1042-4af5-80c0-d73fd3572017_zps0dec932f.jpg

Homemade Hamburger Rolls

Ingredients:

1 Tablespoon of instant yeast (I used Fleischmann's RapidRise Highly Active Yeast.)
1 1/4 teaspoons of salt
1/4 Cup sugar
2 Tablespoons butter
3/4 -1 Cup of lukewarm water - (I started with 3/4 cup and then kept adding as needed using the entire 1 Cup amount.  See King Arthur's website for help in determining how much water to use.)
1 large egg

Topping:

3 Tablespoons of melted butter
or
1 egg plus 1 teaspoon of water
Sesame Seeds (to taste) and optional

Instructions:

Mix all of the ingredients by hand, bread machine on the dough cycle or in a mixer using the dough hook and kneading for about 5-7 min until dough is soft and smooth.

Cover the dough and allow dough to rise in a place free of drafts for about one and a half hours or until dough has doubled in size.

Gently deflate dough and divide it into 8 pieces (I honestly think for better results divide into 10-12 piece, however it will produce slightly smaller rolls).  Shape each piece into a round ball and flatted to about 3 inches across.  Place rolls on a lightly greased or parchment lined baking sheet.  Cover and allow to rise again for 45 min to an hour and until rolls are noticeably puffy.

Brush the top of rolls with 1.5 Tablespoons of melted butter or I used an egg wash that consisted of 1 egg white and 1 teaspoon of water. Garnish with sesame seeds (optional).

Bake the buns in a preheated 375 degree oven for 15-18 min or until golden brown.  Remove from the oven and brush with the remaining butter.  This will give the rolls a satiny, buttery crust.

Cool the rolls on a rack for 20 min prior to serving.

 photo 82d4ed0f-b843-4cb6-947c-0c1fe77b58f3_zps8408654e.jpg

 photo 6c09e5d8-f845-4e01-ae55-4be75f9c5ef0_zps9cfb6215.jpg

 photo d4756e4f-93b4-48b5-a9e2-6a3cc8c06be5_zps24a1e027.jpg

 photo f0ad0a04-4a03-42c9-8208-edb579c4d204_zps88f5693f.jpg

 photo c602b753-fa65-4a88-9db0-82d598a531b8_zps67ae6547.jpg

 photo ce61661d-16e1-469f-9fd0-457b05dccbf1_zps134788ab.jpg

 photo 3e73dcf0-2475-44bc-9a57-4c968f3e8443_zpsb756dbc6.jpg

 photo 1806f2c9-8c3e-4f48-b36d-a7e396e57432_zpsb53be262.jpg


Tuesday, October 15, 2013

Don't forget!

 photo def5b1a9-6b1b-4ffb-9614-10aaf9617c74_zpsaba811ac.jpg

Follow me on Social Media!
C'mon!  It's fun and all of the cool kids are doing it! 

Twitter - @playwithsugar
Instagram - @playwithsugar
Facebook - https://www.facebook.com/pages/Playing-with-Sugar/289421543378
Pinterest - http://www.pinterest.com/sjs1474/playing-with-sugar/
Google + - Stacy Thomas
Also Don't forget to check out our other blog!  

www.lifegonelive.blogspot.com

Twitter - @lifegonelive
Instagram - @lifegonelive
Facebook - https://www.facebook.com/LifeGoneLive
Pinterest - http://www.pinterest.com/sjs1474/life-gone-live/
Google + - Brian and Stacy Thomas

 photo social-media2_zps47b1d205.jpg

Sunday, October 13, 2013

Bruschetta with Tomato and Basil

 photo be7f25e3-a6bd-4cbc-95b2-78a6cd576409_zpsaa2e38d8.jpg

I want to rename this recipe "You betcha I love Bruschetta" (actually pronounced "brusketta" in Italian)! The reason for the desire to rename it you might ask?  It was Brian's first time ever having it and I'm pretty sure his taste buds fell in love! In fact, his original request to "only have a bite" ended up in him being pretty happy that I made the rest of our leftover garlic bread! I have ALWAYS been a huge fan of this recipe and I am SO happy that I have converted him over into my little world!

This was somewhat of an impromptu recipe.  You see I am somewhat of a veggie abuser.  I tend to go grocery shopping for 2 weeks (or more) at a time and it NEVER fails that I buy too many veggies to use in recipes.  They end up looking all ugly, sad, shriveled or wilted before I ever have a chance to show them some proper love!  I have made an effort to NOT allow that to continue to happen so when I saw 5 little Roma or plum tomatoes sitting in my fridge looking at me in despair, I knew exactly what I needed to do!

This can and probably would be considered an appetizer.  I think it is quite common to be served cold on toasted bread,  but since I hadn't eaten lunch, I turned mine into a warmed version with Mozzarella cheese and make a little makeshift Bruschetta pizza.  The results?  DELIZIOSO!

 photo c985871d-c879-4545-83f1-b3edf2ae2a52_zpsa98bb3a2.jpg

Bruschetta with Tomato and Basil
Ingredients:

6 Roma or Plum Tomatoes
2 Tablespoons of Minced Garlic
1 1/2 Tablespoons of Balsamic Vinegar
3 Tablespoons of Extra Virgin Olive Oil
5 teaspoons of sugar
1/2 teaspoon of dried basil (although I would have used and preferred fresh if we had it)
1/2 teaspoon of dried Italian Seasoning 
Bread of your choice baguette French bread, Italian bread or frozen garlic bread.
Mozzarella Cheese - optional and to your liking

Preparation Instructions:

Wash and chop into small cubes all 6 of the tomatoes
Add Garlic, Balsamic Vinegar, Olive Oil, Sugar, Basil and Italian Seasoning to the chopped tomatoes.
Mix thoroughly.

Prepare bread by baking in a preheated 400 degree oven. (if using French or Italian Bread, slice 1/2 inch thick slices on a diagonal, brush with olive oil and place on a cookie sheet, oil side down.)  Toast for 5-7 min or until bread begins to turn golden brown.  Once bread has been toasted, place bread olive oil side up (either side for frozen garlic bread) and add a generous amount of the bruschetta mixture, top with mozzarella cheese and garnish with Italian Seasoning. Place back in the oven and continue baking until the cheese has slightly melted.  If you are serving this cold as a side dish or hor dourve at a party, place in a bowl and allow guests to serve themselves so that the bread doesn't becoming too saturated or soggy prior to serving.

 photo 3d6975ac-cf72-4072-8a97-1d5a4e5cd7bd_zps8805ac04.jpg

 photo 58225921-8785-42b6-8226-f22b4f9e3ba1_zps2843d3dd.jpg

 photo 196936b3-0f9e-4618-8eee-638cffc39c13_zps3c72b2c2.jpg

 photo b9f81e4a-77f6-456c-84d6-41fcffb164f7_zpsfaa35098.jpg

 photo 8c01aa03-75bd-4631-a8e3-c94eb88bf323_zpsf3ad32b7.jpg